jasu's blog
블로그 메뉴검색결과 리스트
actionscript 3.0에 해당되는 글 133건
- 2008.09.03 [AS3] ActionScript의 방향성 8
- 2008.07.23 [AS3] DigiMix 3
- 2008.07.21 [FlashPlayer10] Flash Player 10에서 보완된 기능 리스트 5
- 2008.04.30 Wii remote controller with papervision3d 20
- 2008.04.08 즐거운 만남 플래시 컨퍼런스.... 28
- 2008.04.06 [AS3] TweenMax Bezier Tweening Released by Jack
- 2008.03.01 [AS3] Logger 그래프 4
- 2008.02.05 [AS3] Tween Engine (TweenLite) 4
- 2008.01.29 [AS3] Linkage 클래스를 필요할때 참조 2
- 2008.01.28 [AS3] getTileColor 메소드를 이용한 이미지 6
- 2008.01.28 Flickr API UML - as3flickrlib 3
- 2008.01.23 Wise를 확장한 SimpleFanwise, SimpleArchwise 클래스 응용
- 2008.01.18 [AS3] CurveMotion 2
- 2008.01.17 [AS3] Components
- 2007.12.31 [AS3] private, protected, internal, public을 어떻게 결정하면 좋은가 6
- 2007.11.30 [AS3] CurvePointMotion 2
- 2007.11.07 콜린무크의 「지금부터 시작한다 ActionScript 3.0 - WORLD WIDE TOUR 」 8
- 2007.11.04 [AS3] 텍스트 넘버링.... 3
- 2007.11.03 [AS3] 스테이지에 올려놓은 TextField의 autoSize 설정 3
- 2007.10.14 [AS3] 다이나믹 넘버링... 4
- 2007.10.05 [AS3] CenterPoint 클래스 예제 8
- 2007.09.15 [AS3] 호(arc)를 그리는 클래스 11
- 2007.09.14 [AS3] Pen 클래스 테스트 2
- 2007.09.12 [AS3] UIScrollBar 동적으로 스킨 적용하기 1
- 2007.09.06 [FlashCS3] Auto Format 기능 주의... 4
- 2007.09.03 [AS3] BitmapData.lock and unlock 기능 4
- 2007.08.31 [AS3] SelectArea, DrawShape and Sewing 5
- 2007.08.24 [AS3] Head First - OOAD AS3로 변환
- 2007.08.23 APE : SpringConstraint의 이벤트는 왜...
- 2007.08.18 [AS3] APE : CollisionCircleParticle 2
글
[AS3] ActionScript의 방향성
ES3.1은 ES4의 부분집합이 아니기 때문에 ActionScript 3.0은 ES3.1와 호환되지 않는다. 예를 들어 ES3.1의 문법에는 namespace, package가 포함되지 않는다. ES3.1은 추가 버전업을 진행하더라도 이러한 문법은 포함하지 않을 것을 분명히 하고 있다.
이러한 상황에 대해서 Adobe측에서는 정식으로 코멘트를 하고 있지 않지만 Adobe의 오픈소스팀 디렉터 Dave는 블로그를 통해서 아래와 같이 이야기를 전하고 있다.
* ECMAScript 표준화 위원회 참가 기업의 이해 불일치에 의하여 사양의 일원화가 어려운 상황이다.
* Web에 공통의 언어를 가지는 것이 필요하다는 관점으로부터 Harmony에 찬성한다.
* Web의 혁신을 더욱 진행하기 위해 ActionScript의 확장은 계속된다.
* 오픈소스 커뮤니티 활동의 발전도 표준화 위원회와의 활동과 함께 중요하게 인식하고 있다.
ECAMScript의 표준화에는 계속 참가하지만 ES3.1의 레벨까지 AS3의 기능을 되돌리는 것은 생각하지 않는 것으로 보인다. 눈에 보이는 제품의 성능에 대해서는 어느 것이 좋다 나쁘다로 판단할 근거가 명확하지만 이러한 프로그래밍 언어적 문법에 대한 표준화에는 상당한 이해관계가 얽혀 있는 듯하다.
처음 언어를 배우는 사람에게는 영어이건, 독일어이건 처음 배우는 과정에서 생산되는 엔트로피는 비슷하겠지만 이미 영어를 배우고 익숙한 학생이 독일어를 접하면 적지 않게 혼란스러운 것이 사실이다. 물론 자연어와 다르게 컴퓨터로 명령을 내리는 프로그래밍 언어의 경우는 그 안의 알고리즘 측면에서 본다면 크게 다르지 않겠으나 나와 같이 천천히 흘러가는 뇌의 전류로는 감당하기 버거울 것이다.
AS2에서 AS3로 넘어오면서 가장 나를 혼란스럽게 했던 것은 Void와 void, _alpha와 alpha, _alpha = 100과 alpha=1이었다. 지금도 그 추억에 사로잡혀 멤버변수로 _alpha와 같이 쓰고 있다. 쿠쿠

글
[FlashPlayer10] Flash Player 10에서 보완된 기능 리스트
After Effects CS3에서도 사용되고 있는 Adobe Pixel Bender를 사용하여 사용자 필터, 브랜드 모드 등을 작성할 수 있습니다. Pixel Bender는 하이 퍼포먼스 화상 처리 언어입니다. Pixel Bender를 사용하여 Flash Player의 업데이트를 통해서 주어진 효과를 사용하는 것이 아닌 개발자의 독자적인 효과나 필터를 추가할 수 있습니다. 독자적인 효과나 필터는 기존의 Flash Player에 탑재되고 있는 필터와 함께 사용할 수 있습니다. 또 벡터, 비트맵, 비디오 등 모든 오브젝트에 적용할 수 있으며 오브젝트가 가지고 있는 인터랙티브적인 성질은 그대로 유지합니다. 사용자 효과는 런타임으로 적용할 수 있습니다. 또한 사용자 필터의 사이즈는 보통 1KB정도의 파일 사이즈를 갖기 때문에 플래시 콘텐츠의 용량 증가의 문제가 발생하지 않습니다.
< 3 차원 3D효과 >
모든 2차원 오브젝트를 3차원 형태로 변형할 수 있습니다. 사용자 필터와 같이 2차원 오브젝트가 가지고 있던 인터랙티브 성질은 그대로 유지됩니다. 기존의 Papervision3D나 Sandy, Away3D를 사용하여 3차원 처리를 고속으로 처리할 수 있습니다. 플래시툴에 기본적으로 제공하는 3차원 변형을 통해서 복잡한 3차원 처리를 간단한 코드로 기술할 수 있습니다.
< 새로운 텍스트 엔진 >
새로운 텍스트 엔진은 매우 유연한 텍스트 레이아웃을 제공합니다. 기존에 텍스트, 컨트롤을 통해 새로운 텍스트를 만드는 기술 보완했으며, 사용하기 쉬운 API를 제공합니다. 이로서 다양한 환경에서의 텍스트를 사용할 수 있게 되었습니다. Right-to-Left 식의 세로 형태의 레이아웃 타이포그래피도 지원됩니다.
< 텍스트 레이아웃 컴퍼넌트 >
레이아웃과 스타일 텍스트, 테이블, 인라인 이미지, 그리고 열 정렬을 지원합니다. 이로써 신문과 같이 복잡한 테이블 형태를 지원하게 되어 텍스트필드를 다양하게 사용할 수 있게 되었습니다.(기존에는 이러한 텍스트 필드 자체에서 지원되는 기능적 제약이 있어서 디스플레이 오브젝트에서 처리 프로세스를 따로 만들어야 하는 번거로움이 있었다.)
< 랜더링 API의 개선 >
기존에 화면처리에서는 특정 shape를 화면에 표시하고자 할 때 기존에 화면상에서 존재하던 그래픽 객체를 지우고 다시 그려야 하는 문제로 인하여 메모리나 성능 면에서 불필요한 시스템 자원을 낭비했었습니다. 이번 버전에서는 그러한 문제점을 보완하기 위해서 특정 shape의 일부분만을 교체할 수 있는 것이 가능하게 되어 메모리와 성능 면에서 효율적으로 처리할 수 있게 되었습니다.
< 컬러 관리 >
Flash Player 10은 비교적 정확한 색을 재현할 수 있게 되었다. 컬러 관리에서 swf를 sRGB 색공간(color space)으로 변경가능하며, 컬러 관리는 모니터의 ICC 칼라 프로파일과 동조하여 SWF의 색을 정확하게 재현합니다. 이는 런타임에서 실시간 컬러를 swf에 적용할 수 있습니다.
< 시각적인 퍼포먼스 개선 >
기존의 랜더링은 CPU가 모두 처리하였던 것을 GPU를 통해서 처리할 수 있게 되었습니다. 이로써 기존에 CPU처리 만으로 한계가 있던 화면처리 포퍼먼스를 향상시킬 수 있는 길이 열렸습니다. 결과적으로 그래픽 카드(하드웨어가속)을 이용하여 어플리케이션이 보다 매끄러운 반응 속도를 낼 수 있도록 향상되었습니다. (길이 열렸다는 의미는 아직은 GPU를 사용한 최적화에 따른 개발적인 이슈와 그에 대한 개발 가이드가 아직 나와 있지 않은 상태이기 때문이다. 앞으로 개발에 따른 문제점은 보완될 것이라 기대해 본다.)
< GPU로의 화상 처리 >
화상을 합성·필터의 적용·비디오의 재생이 보다 빠르게 실시할 수 있게 되었습니다. 모든 래스터 오브젝트는 비디오 카드를 사용해 처리됩니다. 하드웨어로 비트맵, 필터, 비디오를 처리하는 것은 기존의 소프트웨어로 랜더링하던 것보다도 빠르게 재생할 수 있습니다. GPU로 화상 처리하는 것은 HTML 파라미터로 사용 여부를 설정할 수 있으며 하드웨어를 사용할 수 있는 사용자 시스템에서만 적용됩니다. 사용자 하드웨어가 GPU를 사용할 수 없는 경우에는 기존대로 소프트웨어로 처리 합니다. Open GL 2.0으로 GLSL를 지원하고 있는 비디오 카드가 있는 경우에만 이 기능을 사용할 수 있습니다. Flash Player의 베타판에서는 GPU 가속으로 처리되고 있을 때는 좌측 상단에 녹색의 사각이 표시됩니다.
< GPU로의 비트맵 전송 >
새로운 HTML 파라미터의 설정을 통해서 SWF를 브라우저에 표시 할 때에 비디오 카드를 사용하도록 할 수 있습니다. 이 기능은 SWF를 새롭게 컴파일 할 필요 없이 사용할 수 있습니다. 이 기능은 Flash Player 9 Update 3으로 도입된 풀 스크린으로의 비디오 표시에 하드웨어 가속화 기능을 확장한 것으로, 랜더링 포퍼먼스가 개선되어 CPU 사용도 효율적으로 관리할 수 있습니다. 결과적으로 비디오나 화상을 사용하는 어플리케이션의 포퍼먼스가 개선됩니다.
< Anti-Aliasing 제거 엔진(Saffron 3.1) >
Saffron를 개량하여 특히 아시아권의 언어를 렌더링 할 때의 Anti-Aliasing 제거의 포퍼먼스나 품질이 개선되었습니다. 또 stroke 폰트를 지원하여 필요한 메모리를 경감시켰습니다.
< Vector 데이터형 >
Flash Player 10의 ActionScript 3.0에서는 ECMAScript 4를 통해서 제안되고 있는 Vector 데이터형을 지원합니다 .Vector 데이터형은 배열과 비슷하지만 요소가 모두 같은 형태가 아니면 안 되는 제약이 있습니다. 요소의 형태에 제약을 두는 것으로 배열 조작보다 포퍼먼스가 획기적으로 개선되었습니다. (일반 배열을 사용할 때 보다 10배 이상의 속도향상이 기대됨)
< 리치 미디어 >
Flash Player 10에서는 다음의 Adobe Flash Media Server나 다른 Adobe 제품으로 제공될 예정인 새로운 오디오·비디오 기능을 탑재했습니다.
< 다이나믹스 트리밍 >
네트워크의 상황에 따라 항상 최적인 비디오 품질을 유지하는 것이 가능하게 되었습니다. bit rate를 변화시키는 것을 통해서 비디오가 재생 중에 끊김이 없도록 할 수 있습니다. 이는 비디오 시청자의 대역에 맞는 비디오 전달이 가능하다는 것을 의미합니다. 앞으로 Flash Media Server에서는 네트워크의 상황에 따라 RTMP로의 비디오 전달로 bit rate를 변화시킬 수 있습니다. 리얼타임에 네트워크 상황과 CPU의 상황을 ActionScript로 확인할 수 있으므로 개발자는 그러한 정보를 바탕으로 비디오 전달을 컨트롤 할 수 있습니다. ( 동영상 플레이어로 동영상을 보다가 플레이되는 속도보다 다운로드되는 속도가 느릴 경우 중간에 버퍼링 시간으로 딜레이 되는 것을 개선할 수 있다는 의미)
< RTMFP (Real Time Media Flow Protocol) >
RTMFP는, 기존의 RTMP over TCP로 가고 있던 시큐어인 데이터 전달을 UDP로 실시하는 것입니다.이 기능을 이용하기 위해서는 앞으로 릴리스 되는 Flash Media Server나, 다른 Adobe 제품을 사용할 필요가 있습니다. UDP는 영상 전달을 위한 효율적인 프로토콜입니다. RTMFP로의 통신은 암호화를 위해서 영상을 보호할 수 있습니다. 이 기술은 2006년에 매수한 Amicima, Inc.에 의하는 것입니다 .
< File Reference runtime access >
Flash Player 9에서도 FileReference를 사용해서 로컬 파일에 액세스 하는 것은 가능합니다만 이 기능은 파일의 업 로드/다운로드를 수행하기 위한 것으로 Flash 어플리케이션에서는 일단 서버를 경유하지 않으면 로컬 파일의 데이터를 사용할 수가 없었습니다. 하지만 Flash Player 10에서는 파일의 읽고 쓰기를 위해서 서버를 사용할 필요가 없이 플래시 어플리케이션에서 읽어 들인 데이터를 바로 사용할 수 있게 되었습니다.
Flash Player 10의 flash.net.FileReference 클래스에 추가된 API
public function get data():ByteArray // 읽힌 데이터 (독해 전용의 프롭퍼티)
public function load():void // 지정된 파일의 읽기 개시
public function save(data:*, name:String = null):void // 저장처를 선택하는 다이얼로그를 표시, 그 후 데이터 저장
< 다이나믹 사운드 제너레이션 >
사운드 클래스는 사운드 오브젝트에 등록된 이벤트 리스너를 통하여 동적으로 생성된 오디오를 재생 가능하게 되었습니다.
< Large Bitmap Support >
Flash Player 10에서는 기존에 2880 x 2880픽셀로 제한했던 비트맵 최대 사이즈를16,777,216 픽셀(4096×4096 픽셀)까지 비트맵을 취급할 수 있게 되었습니다. (AIR를 통해서 듀얼 모니터에서 스트린캡쳐한 비트맵 데이터를 가공할 때 2880 사이즈를 벗어나 생겼던 에러로 고민한 적이 있는데 이를 통해서 쉽게 해결되었다.)
< context menu >
context menu용 ActionScript API를 사용하여 context menu를 좀더 자유롭게 제어가 가능하게 되었습니다. 표준 텍스트와 리치 텍스트의 양쪽 모두를 지원하고 있습니다. 클립보드 메뉴를 통해서 안전하게 제어된 방법으로 클립보드에 액세스 할 수 있으므로 텍스트의 페이스트용 핸들러를 쓸 수도 있습니다.
http://labs.adobe.com/technologies/flashplayer10/releasenotes.html
글
Wii remote controller with papervision3d
wiiFlash를 이용하면 재미있는 것들을 해볼 수 있겠다 싶어서 Wii remote controller를 하나 구입하여 기본적인 테스트를 해봤다. wiiFlash에서 제공하는 wii 리모컨과 통신을 가능하게 하는 패키지를 기본 베이스로 하고 리모컨의 움직임에 따라 나타나는 값을 통해서 papervision3d로 표현해 보았다.
기존에 외국 사람들이 테스트한 동영상을 여러 번 볼 수 있었는데 좀더 재미있는 결과물을 만들기 전에 기본적인 기능 테스트 형태로 만들어 보았다. wiiFlash가 0.4 버전으로 릴리즈되면서 마우스를 컨트롤해주는 기능이 추가 되었다. 이는 플래시를 통해서 구현되는 것이 아니라 소켓통신을 하는 WiiFlashServer에서 컨트롤 할 수 있도록 기능이 들어가 있는 것이다. 이것을 이용하면 멀리서 마우스를 대신하여 리모트컨트롤을 사용할 수 있다.
위리모컨의 기본적인 기능은 중력감지를 통해서 3개의 축(x,y,z)값을 얻을 수 있다. 그리고 리모컨 이외에 센서바가 필요한데 센서바는 왼쪽 오른쪽 각각 3개의 센서를 통해서 적외선이 나오는데 리모컨에서는 이 적외선을 감지하여 각도와 거리를 측정할 수 있다.
예전에 발표로 준비했던 프리젠테이션 템플릿에 위리모컨을 이용했으면 하는 아쉬움이 있다. wiiFlash 패키지를 이용하면 간단하게 리모컨을 이용하여 플래시에서 표현할 수 있기 때문에 플래시 컨텐츠의 어디던지 적용이 가능하다.
집에 Wii 리모컨이 있는 분들은 한번 받아서 사용해 보면 또 다른 재미 경험을 할 수 있을 듯싶다. 사실 컴퓨터가 입력 받는 입력기로는 키보드와 마우스만 있는 것이 아니다. wii리모컨은 이러한 것을 경험을 통해서 다시 한번 느끼게 해준다.
 WiiFlashServer 0.4.exe
테스트 순서 >
1. 블루투스를 이용하여 위리모컨과 컴퓨터를 연결한다.
2. WiiFlashServer를 실행하여 WiiFlashServer프로그램이 1번에서 연결된 리모콘을 감지하는지 확인한다. 감지하면 첫번째 작은 원에 위리모컨 모양이 나타나고 짧게 위리모컨이 진동한다.
3. 올려놓은 파일을 실행한다.
4. 위리모컨을 움직인다. (홈 버튼을 누르면 마우스의 기능을 위리모컨이 가로채는 기능을 on off 할 수 있다. 이는 센서바도 사용해야 한다. 센서바가 없으면 마우스가 왼쪽 하단에서 헤어나오질 못함.)
글
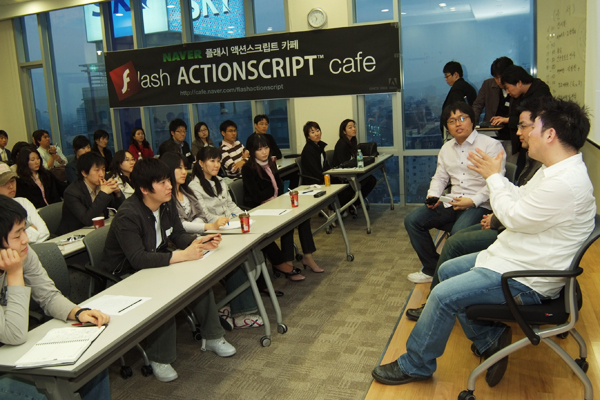
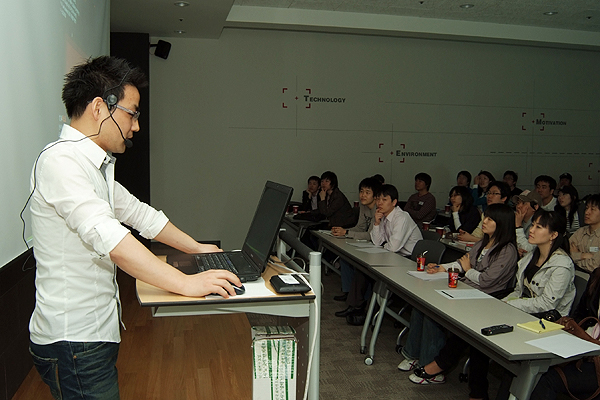
즐거운 만남 플래시 컨퍼런스....
일단 ‘무엇을’ 준비해야 하는가에 대한 고민을 오래 한 것 같다. 무엇이든 일단 시작해 보자는 생각에 프리젠테이션을 위한 프리젠테이션 템플릿을 만들기 시작했다. 무엇보다도 내가 알고 있는 일의 작업 스타일에 대한 이야기를 하는 것이 설명하기도 편하고 오시는 분들도 도움이 될 듯싶었기 때문이다.
일단 무엇을 만들 것이라는 것이 결정되고 일주일 정도 지났을 때, 나는 작업량의 절반 정도를 진행하고 있었다. 그러던 어느 날 작업하던 flashDevelop 패키지 파일이 열리지가 않아서 각각 클래스들을 열어 봤더니 총 7개 정도의 클래스 파일이 깨져서 열리지 않거나 다른 클래스 소스와 짬뽕이 된 코드가 눈앞에서 펼쳐져 있더라는….쿨럭…
외장하드에 자료를 보관하고 있었는데 외장하드의 물리적인 트랙 에러가 발생한 듯싶었다. 일단 살아 있는 코드를 다른 하드에 저장 했다. 소실된 클래스들을 다시 만들 생각하니 힘이 쫙 빠졌다. 문제의 클래스(총 3개 정도는 파일이 열리지 않았었고 4개 정도의 파일이 회사 작업 클래스 코드들과 얽혀 있었다)들을 작성하는 데는 3시간 정도의 작업 시간이 걸린 것 같다.(했던 작업을 다시 하는 것인지라 3시간이 길게 느껴지긴 했다.)
 사진출처 : 문군
아무튼 그런 우여곡절 끝에 프리젠테이션 템플릿은 완성이 되었다. 하지만 이제는 ‘어떻게’가 문제였다. 어떤 내용으로 이것을 잘 포장하여 이야기를 풀어야 하는지는 생각조차 하지 않았기 때문에….
결국 내용은 평소에 보던 책과 인터넷을 헤집고 다니면서 얻은 자료들을 토대로 준비하게 되었다. 마지막 날에는 감기몸살까지 찾아와서 고생을 좀 했으니 내가 할 수 있는 노력은 어느 정도 했다고 생각하는데 이런 발표자의 마음이 전달 되었는지는 잘 모르겠다.
사실 컨퍼런스에 오신 분들의 작업 스타일, 하는 일에 대해서 충분히 고려하지 못했다는 생각이 든다. 너무 내 안에 있는 이야기만 일방적으로 한 것은 아닌가 하는 아쉬움이 남는다.
발표가 끝나고 1차, 2차, 3차까지 달렸는데, 살인적인 입담을 소유하고 있는 진우와, 앞 테이블(나에게는 뒷 테이블이어서 다행이었다. 쿠쿠) 연인의 행각에 어쩔 줄 몰라 하시는 땡굴이 형의 모습에 새벽 첫차를 타고 집에 도착할 때까지 턱이 아프도록 웃었다.
 사진출처 : 문군 사진출처 : 문군 | 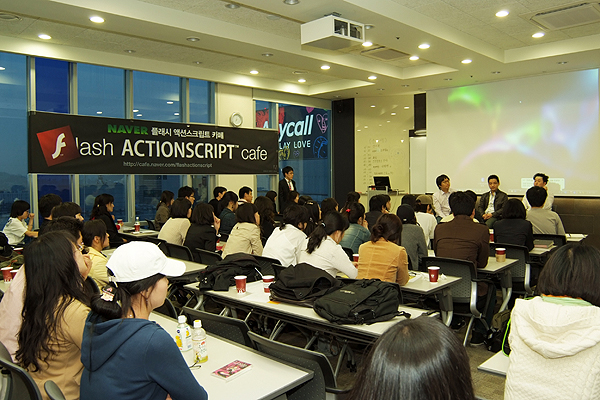 사진출처 : 문군 사진출처 : 문군 |
다시 한번 궂은 일 마다하지 않고 컨퍼런스를 준비해 준 땡굴이형님과 그 아이들(문군포함 스텝님들)에게 고마움을 전한다. 그리고 결코 가볍지 않은 행사 후원을 해주신 단군소프트 관계자 분에게도 감사하다는 말을 전하고 싶다.
 사진출처 : 문군
비록 발표는 아쉬웠지만 내가 할 수 있는 일은 마무리하는 것이 좋을 것 같아서 컨퍼런스 때 발표했던 프리젠테이션 템플릿 소스와 UML등을 압축하여 올려 놓는다. 시간에 쫓기며 진행한 작업이니 잘못 된 부분도 있을 수 있고 좀더 최적화 해야 하는 부분에서 쉽게 쉽게 진행한 부분도 있으니 이해를 바란다.
다시 한번 노파심에서 말씀 드리지만 이 자료는 OOP 개념에 대한 이해의 목적으로 만들어진 자료이기 때문에 완벽하지 않을 수 있다. 하지만 OOP를 처음 접하거나 느낌이 슬슬 오기 시작하신 분들에게는 조금이나마 도움이 될 수 있지 않을까 싶다.
아무쪼록 사회생활을 준비하고 열심히 공부 하려는 후배들에게 플래시가 즐거운 공부와 놀이가 되었으면 한다. 파이팅~ ^^
 ActionScript발표자료.alz
글
[AS3] TweenMax Bezier Tweening Released by Jack
http://blog.greensock.com/tweenmaxas3/
Tweener와 속도 비교해보면 많은 오브젝트를 tween 시킬 때의 속도 차이를 느낄 수 있다.
http://blog.greensock.com/bezier-speed-test/
글
[AS3] Logger 그래프
엑셀에서의 XML 스프레드시트를 저장하여 일련의 숫자 데이터를 LineGraph로 표현해주는 기능을 한다. 사내 회의 때 사용할 목적으로 만들게 되었다. 사용하는 XML 스프레드시트 데이터는 기본적으로 규칙을 가지고 있는데 아래와 같다.
하나의 셀에는 1뎁스, 2뎁스, 3뎁스까지 표현을 하고 그 이후 데이터들은 날자 별로 각각의 데이터가 들어가게 된다. 반듯이 지켜야 할 규칙은 1뎁스, 2뎁스, 3뎁스를 표현해야 하며 3뎁스의 첫번째 group의 [방문수, 절대 고유 방문자수, 페이지뷰, 평균 페이지뷰, 사이트 방문 시간] 5개의 데이터 타입을 아래에 group에서도 똑같이 적용을 하여야 한다.
위 최소한의 규칙을 적용한다면 cell의 가로 길이나 1뎁스, 2뎁스의 개수는 몇 개라도 상관이 없다.
이렇게 한 이유는 사용하고자 하는 데이터의 형태를 따르게 되었기 때문이다. 초기 작업 진행에 있어서 xml 스프레드시트 데이터의 형태가 트리구조의 형태를 갖지 못하기 때문에 데이터 표현에 있어서 어떠한 방법을 사용해야 하는지가 고민이었다. 1뎁스 데이터 안에 2뎁스와 3뎁스를 group화 할 경우에 각각의 데이터 비교에 있어서 하나의 그래프에 여러 개의 라인그래프를 넣어야 할 경우 불필요한 참조 형태이기 때문에 복잡한 데이터 구조를 조합하여 하나의 group데이터로 표현해야 하는 문제가 있었다. 이로 인해 CPU낭비와 구조화 작업에 있어서 어려움이 예상되었다.
그래서 뎁스에 따른 데이터를 group화 하지 않고 xml 스프레드시트의 각 라인별(cell단위)를 기준으로 하나의 데이터로 표현하고 AssetData 클래스를 통해서 각각의 cell 데이터를 검사하여 원하는 서비스별 데이터를 array로 받아올 수 있도록 하였다.
이렇게 데이터를 구분하였을 때 1뎁스, 2뎁스에서 원하는 데이터들을 멀티 선택하여 화면에 표현할 수 있게 되었다.
한 화면에서 보여질 수 있는 그래프는 위에서 언급한 것과 같이 [방문수, 절대 고유 방문자수, 페이지뷰, 평균 페이지뷰, 사이트 방문 시간] 5개의 그래프 컨테이너를 보여줄 수 있으며 각각의 그래프컨테이너에는 여러 개의 cell 데이터에 해당하는 라인그래프를 표현할 수 있다.
상단에 풀스크린을 지원하는 아이콘을 클릭할 경우 풀스크린으로 보여질 수 있으나 flashPlayer에서의 풀스크린을 할 경우 키보드 이벤트가 작동하지 않기 때문에 멀티선택을 할 수 없는 문제점이 있다. exe파일은 풀스크린이더라도 키보드 입력을 받을 수 있다.
exe파일 버전으로 올려 놓는다. xml데이터는 가상의 데이터 값을 넣어두었으니 필요하신 분은 비교 대상의 데이터를 직접 넣어서 사용해보면 좋을 것 같다. 플래시 안에서 data.xml 파일을 로드하게 해놓았으니 Logger.exe파일과 같은 폴더에 data.xml 데이터를 넣어서 사용하면 된다.


 Logger.zip
글
[AS3] Tween Engine (TweenLite)
비교 대상이 되는 것들은 Tweener와 TweenLite이다. Tweener은 그 사용법과 Bezier 곡선 처리 기능을 제공하기 때문에 사용성면에서 좋은 엔진이지만 많은 기능들이 포함되어 있는 만큼 속도는 약간 떨어진다.
Benchmark results: Simple AS3 Tween
------------------
125 Sprites :: Start Lag: 0 seconds :: FPS: 57
250 Sprites :: Start Lag: 0 seconds :: FPS: 57
500 Sprites :: Start Lag: 0 seconds :: FPS: 55
1000 Sprites :: Start Lag: 0 seconds :: FPS: 47
2000 Sprites :: Start Lag: 0.01 seconds :: FPS: 38
4000 Sprites :: Start Lag: 0.06 seconds :: FPS: 26
Benchmark results: TweenLite
------------------
125 Sprites :: Start Lag: 0 seconds :: FPS: 61
250 Sprites :: Start Lag: 0 seconds :: FPS: 55
500 Sprites :: Start Lag: 0.01 seconds :: FPS: 40
1000 Sprites :: Start Lag: 0.01 seconds :: FPS: 31
2000 Sprites :: Start Lag: 0.02 seconds :: FPS: 23
4000 Sprites :: Start Lag: 0.18 seconds :: FPS: 19
Benchmark results: Tweener
------------------
125 Sprites :: Start Lag: 0.11 seconds :: FPS: 56
250 Sprites :: Start Lag: 0.02 seconds :: FPS: 61
500 Sprites :: Start Lag: 0.06 seconds :: FPS: 46
1000 Sprites :: Start Lag: 0.2 seconds :: FPS: 33
2000 Sprites :: Start Lag: 0.45 seconds :: FPS: 25
4000 Sprites :: Start Lag: 1.4 seconds :: FPS: 17
TweenLite는 filter에 관련된 기능들은 TweenFilterLite로 따로 빠져있다. 특별한 기능이 아닌 오브젝트의 모션 처리는 x,y,scaleX, scaleY, width, height, alpha 등과 추가하면 color 적용일 것이다. TweenLite는 tint 속성으로 그것을 대신하고 있다. 기본적인 사용법은 아래와 같다.
import gs.TweenLite;
TweenLite.to(mc, 1, {x:46, y:43, scaleX:1, scaleY:1, rotation:0, alpha:1, tint:0x3399ff});
사용법이 Tweener와 많은 부분 흡사하다. mc는 타겟이되는 Object, 1은 모션 time이고 {} 오브젝트 형태로 적용 속성들과 모션 함수를 적용할 수가 있다. ease 속성으로 모션 함수를 적용할 수가 있는데 함수는 fl.motion.easing 패키지 안에 있는 함수를 적용하게 되므로 fl.motion.easing 패키지를 import 시켜서 사용하면 된다. 그리고 Tweener에서와 같이 onStart, onUpdate, onComplete 를 지원한다. 아래 예,
import gs.TweenLite;
import fl.motion.easing.Back;
TweenLite.to(mc, 5, {alpha:0.5, x:120, ease:Back.easeOut, delay:2,
onComplete:onFinishTween, onCompleteParams:[5, clip_mc]});
function onFinishTween(argument1:Number, argument2:MovieClip):void {
trace("The tween has finished! argument1 = " + argument1 + ",
and argument2 = " + argument2);
}
USAGE
- Description: Tweens the target's properties from whatever they are at the time you call the method to whatever you define in the variables parameter.
- Parameters:
- target: Target MovieClip (or any object) whose properties we're tweening
- duration: Duration (in seconds) of the tween
- variables: An object containing the end values of
all the properties you'd like to have tweened (or if you're using the
TweenLite.from() method, these variables would define the BEGINNING
values). Putting quotes around values will make the tween relative to
the current value. For example, x:"-20" will tween x to whatever it
currently is minus 20 whereas x:-20 will tween x to exactly -20. Here
are some examples of properties you might include:
- alpha: The alpha (opacity level) that the target object should finish at (or begin at if you're using TweenLite.from()). For example, if the target.alpha is 1 when this script is called, and you specify this parameter to be 0.5, it'll transition from 1 to 0.5.
- x: To change a MovieClip's x position, just set this to the value you'd like the MovieClip to end up at (or begin at if you're using TweenLite.from()).
Special Properties (**Optional**):
- delay: The number of seconds you'd like to delay before the tween begins. This is very useful when sequencing tweens
- ease: You can specify a function to use for the easing with this variable. For example, fl.motion.easing.Elastic.easeOut. The Default is Regular.easeOut.
- easeParams: An array of extra parameter values to feed the easing equation. This can be useful when you use an equation like Elastic and want to control extra parameters like the amplitude and period. Most easing equations, however, don't require extra parameters so you won't need to pass in any easeParams.
- autoAlpha: Same as changing the "alpha" property but with the additional feature of toggling the "visible" property to false if the alpha ends at 0. It will also toggle visible to true before the tween starts if the value of autoAlpha is greater than zero.
- volume: To change a MovieClip's volume, just set this to the value you'd like the MovieClip to end up at (or begin at if you're using TweenLite.from()).
- tint: To change a MovieClip's color, set this to the hex value of the color you'd like the MovieClip to end up at(or begin at if you're using TweenLite.from()). An example hex value would be 0xFF0000. If you'd like to remove the color from a MovieClip, just pass null as the value of tint. Before version 5.8, tint was called mcColor (which is now deprecated and will likely be removed at a later date although it still works)
- onStart: If you'd like to call a function as soon as the tween begins, pass in a reference to it here. This can be useful when there's a delay and you want something to happen just as the tween begins.
- onStartParams: An array of parameters to pass the onStart function.
- onUpdate: If you'd like to call a function every time the property values are updated (on every frame during the time the tween is active), pass a reference to it here.
- onUpdateParams: An array of parameters to pass the onUpdate function (this is optional)
- onComplete: If you'd like to call a function when the tween has finished, use this.
- onCompleteParams: An array of parameters to pass the onComplete function (this is optional)
- overwrite: If you do NOT want the tween to automatically overwrite any other tweens that are affecting the same target, make sure this value is false.
- Description: Exactly the same as TweenLite.to(), but instead of tweening the properties from where they're at currently to whatever you define, this tweens them the opposite way - from where you define TO where ever they are now (when the method is called). This is handy for when things are set up on the stage where the should end up and you just want to animate them into place.
- Parameters: Same as TweenLite.to(). (see above)
- Description: Provides an easy way to call any function after a specified number of seconds. Any number of parameters can be passed to that function when it's called too.
- Parameters:
- delay: Number of seconds before the function should be called.
- onComplete: The function to call
- onCompleteParams [optional] An array of parameters to pass the onComplete function when it's called.
- Description: Provides an easy way to kill all tweens of a particular Object/MovieClip. You can optionally force it to immediately complete (which will also call the onComplete function if you defined one)
- Parameters:
- target: Any/All tweens of this Object/MovieClip will be killed.
- complete: If true, the tweens for this object will immediately complete (go to the ending values and call the onComplete function if you defined one).
- Description: Provides an easy way to kill all delayed calls to a particular function (ones that were instantiated using the TweenLite.delayedCall() method).
- Parameters:
- function: Any/All delayed calls to this function will be killed.
EXAMPLES
As a simple example, you could tween the alpha to 50% (0.5) and move the x position of a MovieClip named "clip_mc" to 120 and fade the volume to 0 over the course of 1.5 seconds like so:
-
import gs.TweenLite;
-
TweenLite.to(clip_mc, 1.5, {alpha:0.5, x:120, volume:0});
If you want to get more advanced and tween the clip_mc MovieClip over 5 seconds, changing the alpha to 50% (0.5), the x coordinate to 120 using the Back.easeOut easing function, delay starting the whole tween by 2 seconds, and then call a function named "onFinishTween" when it has completed and pass in a few parameters to that function (a value of 5 and a reference to the clip_mc), you'd do so like:
-
import gs.TweenLite;
-
import fl.motion.easing.Back;
-
TweenLite.to(clip_mc, 5, {alpha:0.5, x:120, ease:Back.easeOut, delay:2, onComplete:onFinishTween, onCompleteParams:[5, clip_mc]});
-
function onFinishTween(parameter1_num:Number, parameter2_mc:MovieClip):void {
-
trace("The tween has finished! parameters: " + parameter1_num + ", and " + parameter2_mc);
-
}
If you have a MovieClip on the stage that is already in its end position and you just want to animate it into place over 5 seconds (drop it into place by changing its y property to 100 pixels higher on the screen and dropping it from there), you could:
-
import gs.TweenLite;
-
import fl.motion.easing.Elastic;
-
TweenLite.from(clip_mc, 5, {y:"-100", ease:Elastic.easeOut});
FAQ
- Can I set up a sequence of tweens so that they occur one after the other?
Of course! Just use the delay property and make sure you set the overwrite property to false (otherwise tweens of the same object will always overwrite each other to avoid conflicts). Here's an example where we colorize a MovieClip red over the course of 2 seconds, and then move it to a _y coordinate of 300 over the course of 1 second:-
import gs.TweenLite;
-
TweenLite.to(clip_mc, 2, {tint:0xFF0000});
-
TweenLite.to(clip_mc, 1, {y:300, delay:2, overwrite:false});
-
- Do the properties have to be in a specific order?
Nope. The only thing that matters is that the first parameter is the object you're tweening, the second parameter is the time (in seconds), and the third parameter contains all the properties you want to tween (in any order). So TweenLite.to(clip_mc, 1, {scaleX:120, y:200, x:1}) is the same as TweenLite.to(clip_mc, 1, {x:1, y:200, scaleX:120}); - Why are TweenLite and TweenFilterLite split into 2 classes instead of building all the functionality into one class?
- File size. Only a portion of projects out there require tweening of filters. Almost every project I work on uses TweenLite, but only a few require tweening filters (TweenFilterLite). TweenLite is 2k whereas TweenFilterLite is 5k. Again, one of the stated purposes of TweenLite is to minimize file size & code bloat. If someone only wants to use TweenFilterLite, fine. But I think many people appreciate being able to use the most lightweight option for their needs and shave off the 3k when possible.
- Speed. Tweening filters is a more complex task. There are additional if/else statements and calculations in the rendering loop inside TweenFilterLite which could potentially slow things down a bit, even for non-filter tweens (I doubt anyone would notice a difference unless they’re running hundreds or thousands of simultaneous tweens, but I’m a big fan of keeping things as efficient & fast as possible)
- Do I have to pay for a license to use this code? Can I use it for commercial purposes?
Feel free to take the code and use it as you wish, even for commercial purposes. Some people have requested the ability to donate money to reward the work I put into the class(es), so i put a PayPal "donate now" button at the top and bottom of the page, but you certainly don't need to donate anything. I'm just glad to help the Flash community. - Are TweenLite and TweenFilterLite better than Tweener, Fuse, MC Tween, and all the other tweening engines out there?
Maybe, maybe not. It all depends on your objectives, coding style, etc. I certainly don't claim that TweenLite & TweenFilterLite are superior to all other tweening engines, but in terms of the power-to-file-size ratio, I certainly haven't seen anything that comes close. Feedback has been overwhelmingly positive. I've used TweenLite for many years and it hasn't let me down. I never found myself needing features that are available in another tweening engine. But hey, to each his own.
OBJECTIVES
- Minimize file size
- Maximize flexibility and efficiency by extending the TweenLite class. That way, if you don't need to tween filters, you can just use TweenLite (about 2k); otherwise, this class will only add another 3k (5k total)
- Minimize the amount of code required to initiate a tween
- Maximize performance
- Allow for very flexible callbacks (onComplete, onUpdate, onStart, all with the ability to pass any number of parameters)
FITLERS & PROPERTIES:
- type:"Blur" -
blurX, blurY, quality - type:"Glow" -
alpha, blurX, blurY, color, strength, quality - type:"Color" -
colorize, amount, contrast, brightness, saturation, hue, threshold, relative - type:"DropShadow" -
alpha, angle, blurX, blurY, color, distance, strength, quality - type:"Bevel" -
angle, blurX, blurY, distance, highlightAlpha, highlightColor, shadowAlpha, shadowColor, strength, quality
USAGE
- Description: Tweens the target's properties from whatever they are at the time you call the method to whatever you define in the variables parameter.
- Parameters:
- target: Target DisplayObject whose properties we're tweening
- duration: Duration (in seconds) of the tween
- variables: An object containing the end values of
all the properties you'd like to have tweened (or if you're using the
TweenFilterLite.from() method, these variables would define the
BEGINNING values). Putting quotes around values will make the tween
relative to the current value. For example, x:"-20" will tween x to
whatever it currently is minus 20 whereas x:-20 will tween x to exactly
-20. Here are some examples of properties you might include:
- blurX
- blurY
- color: An example for red would be 0xFF0000. Several filters use this property, like DropShadow and Glow
- colorize: Only used with a type:"Color" tween to colorize an entire MovieClip.
- amount: Only used to control the amount of colorization.
Special Properties:
- type: REQUIRED. A string that indicates what type of filter you're tweening. Possible values are: "Color" (for all image effects like colorize, brightness, contrast, saturation, and threshold), "Blur", "Glow", "DropShadow", or "Bevel"
- delay: Number of seconds to delay before the tween begins. This can be very useful when sequencing tweens.
- ease: You can specify a function to use for the easing with this variable. For example, fl.motion.easing.Elastic.easeOut. The Default is Regular.easeOut.
- easeParams: An array of extra parameter values to feed the easing equation. This can be useful when you use an equation like Elastic and want to control extra parameters like the amplitude and period. Most easing equations, however, don't require extra parameters so you won't need to pass in any easeParams.
- autoAlpha: Same as changing the "alpha" property but with the additional feature of toggling the "visible" property to false if the alpha ends at 0. It will also toggle visible to true before the tween starts if the value of autoAlpha is greater than zero.
- volume: To change a MovieClip's volume, just set this to the value you'd like the MovieClip to end up at (or begin at if you're using TweenFilterLite.from()).
- tint:To change a MovieClip's color, set this to the hex value of the color you'd like the MovieClip to end up at(or begin at if you're using TweenLite.from()). An example hex value would be 0xFF0000. If you'd like to remove the color from a MovieClip, just pass null as the value of tint. Before version 5.8, tint was called mcColor (which is now deprecated and will likely be removed at a later date although it still works)
- onStart: If you'd like to call a function as soon as the tween begins, pass in a reference to it here. This can be useful when there's a delay and you want something to happen just as the tween begins.
- onStartParams: An array of parameters to pass the onStart function.
- onUpdate: If you'd like to call a function every time the property values are updated (on every frame during the time the tween is active), pass a reference to it here.
- onUpdateParams: An array of parameters to pass the onUpdate function (this is optional)
- onComplete: If you'd like to call a function when the tween has finished, use this.
- onCompleteParams: An array of parameters to pass the onComplete function (this is optional)
- overwrite: If you do NOT want the tween to automatically overwrite any other tweens that are affecting the same target, make sure this value is false.
- Description: Exactly the same as TweenFilterLite.to(), but instead of tweening the properties from where they're at currently to whatever you define, this tweens them the opposite way - from where you define TO where ever they are now (when the method is called). This is handy for when things are set up on the stage the way the should end up and you just want to tween them to where they are.
- Parameters: Same as TweenFilterLite.to(). (see above)
- Description: Provides an easy way to call any function after a specified number of seconds. Any number of parameters can be passed to that function when it's called too.
- Parameters:
- delay: Number of seconds before the function should be called.
- onComplete: The function to call
- onCompleteParams [optional] An array of parameters to pass the onComplete function when it's called.
- Description: Provides an easy way to kill all tweens of a particular Object/MovieClip. You can optionally force it to immediately complete (which will also call the onComplete function if you defined one)
- Parameters:
- target: Any/All tweens of this Object/MovieClip will be killed.
- complete: If true, the tweens for this object will immediately complete (go to the ending values and call the onComplete function if you defined one).
- Description: Provides an easy way to kill all delayed calls to a particular function (ones that were instantiated using the TweenFilterLite.delayedCall() method).
- Parameters:
- function: Any/All delayed calls to this function will be killed.
EXAMPLES
-
import gs.TweenFilterLite;
-
TweenFilterLite.to(clip_mc, 1.5, {type:"Blur", blurX:20, blurY:20});
-
import gs.TweenFilterLite;
-
import fl.motion.easing.Back;
-
TweenFilterLite.to(clip_mc, 5, {type:"Color", saturation:0, delay:2, onComplete:onFinishTween, onCompleteParams:[5, clip_mc]});
-
function onFinishTween(argument1_num:Number, argument2_mc:MovieClip):void {
-
trace("The tween has finished! argument1_num = " + argument1_num + ", and argument2_mc = " + argument2_mc);
-
}
-
import gs.TweenFilterLite;
-
TweenFilterLite.from(clip_mc, 5, {type:"color", colorize:0xFF0000});
FAQ
- Can I set up a sequence of tweens so that they occur one after the other?
Of course! Just use the delay property and make sure you set the overwrite property to false (otherwise tweens of the same object will always overwrite each other to avoid conflicts). Here's an example where we colorize a MovieClip red over the course of 2 seconds, and then blur it over the course of 1 second:-
import gs.TweenFilterLite;
-
TweenFilterLite.to(clip_mc, 2, {type:"color", colorize:0xFF0000, amount:1});
-
TweenFilterLite.to(clip_mc, 1, {type:"blur", blurX:20, blurY:20, delay:2, overwrite:false});
-
- Do the properties have to be in a specific order?
Nope. The only thing that matters is that the first parameter is the object you're tweening, the second parameter is the time (in seconds), and the third parameter contains all the properties you want to tween (in any order). So TweenFilterLite.to(clip_mc, 1, {type:"color", colorize:0xFF0000, amount:1}) is the same as TweenFilterLite.to(clip_mc, 1, {amount:1, colorize:0xFF0000, type:"color"}); - Can I use TweenFilterLite to tween things other than filters?
Sure. It extends TweenLite, so you can tween any property you want. TweenFilterLite.to(my_mc, 1, {x:200}) gives you the same result as TweenLite.to(my_mc, 1, {x:200}). However, I'd recommend using TweenLite to tween properties other than filters for two reasons:- In order to accommodate the specialized nature of filters, TweenFilterLite's code is a bit lengthier which translates into more work for the processor. It's doubtful that anyone would notice a performance hit unless you're tweening hundreds or thousands of instances simultaneously, but I'm a bit of an efficiency freak.
- TweenLite can tween any property of ANY object whereas TweenFilterLite tweens properties of DisplayObjects (like MovieClips, Sprites, etc.)
- Why are TweenLite and TweenFilterLite split into 2 classes instead of building all the functionality into one class?
- File size. Only a portion of projects out there require tweening of filters. Almost every project I work on uses TweenLite, but only a few require tweening filters (TweenFilterLite). TweenLite is 2k whereas TweenFilterLite is 5k. Again, one of the stated purposes of TweenLite is to minimize file size & code bloat. If someone only wants to use TweenFilterLite, fine. But I think many people appreciate being able to use the most lightweight option for their needs and shave off the 3k when possible.
- Speed. Tweening filters is a more complex task. There are additional if/else statements and calculations in the rendering loop inside TweenFilterLite which could potentially slow things down a bit, even for non-filter tweens (I doubt anyone would notice a difference unless they’re running hundreds or thousands of simultaneous tweens, but I’m a big fan of keeping things as efficient & fast as possible)
- Do I have to pay for a license to use this code? Can I use it for commercial purposes?
Feel free to take the code and use it as you wish, even for commercial purposes. Some people have requested the ability to donate money to reward the work I put into the class(es), so i put a PayPal "donate now" button at the top and bottom of the page, but you certainly don't need to donate anything. I'm just glad to help the Flash community. - Are TweenLite and TweenFilterLite better than Tweener, Fuse, MC Tween, and all the other tweening engines out there?
Maybe, maybe not. It all depends on your objectives, coding style, etc. I certainly don't claim that TweenLite & TweenFilterLite are superior to all other tweening engines, but in terms of the power-to-file-size ratio, I certainly haven't seen anything that comes close. Feedback has been overwhelmingly positive. I've used TweenLite for many years and it has never let me down. I've never found myself needing features that are available in another tweening engine. But hey, to each his own.
글
[AS3] Linkage 클래스를 필요할때 참조
public function getDefinitionByName(name:String):Object
플래시에서의 Public 함수 중에서 getDefinitionByName() 함수는 name 매개 변수로 지정된 클래스의 클래스 객체에 대한 참조를 반환해 준다.
var c:Class = getDefinitionByName("m"+2) as Class; // 라이브러리에 있는 Linkage 클래스명 "m2"의 참조를 반환한다.
글
[AS3] getTileColor 메소드를 이용한 이미지
랜덤한 형태에서 좀더 관련이 있는 부분들을 조합하면 불규칙적이지만 규칙이 있는 재질을 만들어 낼 수 있을 듯 싶다.

글
Flickr API UML - as3flickrlib
Project Page: http://code.google.com/p/as3flickrlib/
Project Group: http://groups.google.com/group/as3flickrlib
위 구글 코드에서 오픈되어 있는 flickr API adobe 소스를 UML로 변환해 보았다. 필요하신 분들은 참고하시면 좋을 듯 싶다. 기본적인 상속과 합성관계만 형성해 놓은 상태, 대부분 합성으로 페키지가 구성되어 있다.
참고. 새벽에 작성한 관계로 틀린 부분이 있을 수 있음.

글
Wise를 확장한 SimpleFanwise, SimpleArchwise 클래스 응용
아래 CREATE 버튼을 클릭하면 왼쪽은 SimpleFanwise를 이용한 것이고 오른쪽은 SimpleArchwise를 이용하여 20개 오브젝트 생성후 사라지는 모션을 적용해 봤다.
글
글
[AS3] Components
기본 Style 클래스 내에서 컴포넌트 스킨을 적용하고 모든 컴포넌트 스킨 일괄 적용을 위해서 Component 클래스의 setStyle를 override 하도록 하였다.
심플한 Display 형태와 구조이지만 컴포넌트를 통해서 구조적 접근 방법을 좀더 다양화 할 수 있지 않을까 싶어서 만들어 보았다.

글
[AS3] private, protected, internal, public을 어떻게 결정하면 좋은가
일본의 ASer의 포스트을 보고 나를 포함한 많은 플래시 작업자들이 개념적으로는 이해 하고 있지만 실전에서 흐지부지 하게되는 것을 지양하기 위해서 그 분의 포스트을 토대로 접근자들을 정리해 본다.
각 접근자의 개념은 아래와 같다.
내부 이용자(자기 자신) -> private
계승이용자(서브 클래스) -> protected
외부 이용자(동일 패키지의 제삼자) -> internal
외부 이용자(다른 패키지의 제삼자) -> public
이하에 패키지 A_package의 클래스 A_class를 예로 들어 아래와 같을 경우, A_package 패키지 내에서는 모두 접근이 가능하다.
동일 패키지의 상속 클래스는 private를 제외한 속성들에 접근이 가능하다.
동일 패키지의 다른 클래스는 protected 속성에 액세스할 수 없지만 internal에는 액세스할 수 있다.
다른 패키지의 상속 클래스에서는 protected에는 액세스할 수 있지만 internal에는 액세스할 수 없다.
다른 패키지의 다른 클래스에서는 public밖에 액세스할 수 없다.
예전에는 이런 구분 자체가 내 머리속을 어지럽게 하여 private와 public만을 사용했었다. AS3로 넘어오면서 상속, 합성, 오버라이드를 이용한 작업이 늘어나면서 유기적인 클래스들과의 관계 중심으로 구조를 설계하다보니 클래스 간에 접근 규정을 코멘트로 달아놓지 않는 한 스스로 혼란스럽게 되었다. 보통 private로 해두고 protected→internal→public 방향으로 작업을 하면 되겠으나 이것 또한 중간중간 에러체크를 감당해야 하는 부담을 지울 수가 없다.
확실히 private, protected, internal, public을 구분해서 작업 하는 것이 현재 작업자에게도 큰 도움이 된다. 가장 바람직한 방법으로는 작은 프로젝트라도 작업에 들어가기 전에 구조를 설계하고 노트에 UML 비스무리한 낙서를 하고 시작하는 것이 좋을 것 같다.
글
[AS3] CurvePointMotion
글
콜린무크의 「지금부터 시작한다 ActionScript 3.0 - WORLD WIDE TOUR 」
토픽은 객체지향프로그래밍, 클래스, 오브젝트, 변수, 메소드, 패키지, 조건 제어, 루프, 연산자, 함수, 이벤트 핸들링, 화면상에서의 표시, 프로그램의 컴파일 및 실행 등과 관련된 내용이다.
학습 내용
* 오브젝트 프로그래밍의 모든 주요 개념
* 클래스 및 오브젝트의 이해
* ActionScript 3.0프로그램의 구축 및 기술 방법
* Flex Builder 2의 개발 환경
* ActionScript3.0주요 개념의 리뷰
일정 :
2008년1월15일(화) 9:30개장 10:00-19:00 300명

MAX 레퍼런스가 한국에서 개최되지 않았던 것도 아쉬운 마당에 이런 군침 도는 기회조차 일본에 빼앗긴 것 같아서 아쉽다. 하루 동안에 얼마나 많은 지식을 얻을 수 있겠냐고 이야기 할 수도있지만 그 느낌만으로도 충분한 가치가 있는 자리가 아닐까 싶다.
일본에 계시거나 일본에 가는 분들은 신청을 해보시길….
http://www.event-web.net/as3/
글
[AS3] 텍스트 넘버링....
화면에서 클릭을 하면 넘버링 효과와 함께 클릭한 위치로 텍스트필드가 이동을 한다. 이동 좌표 모션은 랜덤한 4 point 좌표에 해당하는 Bezier 곡선으로 이동을 하며, DropShadow 필터의 blurY, blurX, distance, angle 속성 또한 랜덤으로 적용하였다.
텍스트필드가 위로 올라가는 느낌이 나도록 distance와 blurX, blurY속성은 같은 값이 되도록 하였다. 텍스트 모션이 끝나는 시점에서 화면을 BitmapData로 저장하여 사각 박스의 한 면이 떨어지는 효과를 넣었는데 up, down, right, left는 랜덤으로 그때마다 적용을 달리 해봤다.
별 의미 없는 작업이지만 재미있게 놀았던 것 같다…
글
[AS3] 스테이지에 올려놓은 TextField의 autoSize 설정
문제의 이유는 확인하지 못하였는데 여러가지 테스트를 해보다가 결국은 기존에 있던 텍스트 필드를 삭제하고 다시 텍스트 필드를 만들어서 같은 속성으로 적용을 해보니 이번에는 제대로 먹는다...
stage에 있는 TextField의 폰트를 임베드 시키고 폰트를 다른 폰트로 바꾸게 되면 그때부터 autoSize 속성이 적용이 되지 않는다. 텍스트필드에 filter를 적용해도 autoSize 속성이 먹통이 되버린다...
저 처럼 stage에 올려놓은 텍스트필드의 autoSize가 먹히지 않을 때에는 주저하지 말고 기존에 있던 텍스트 필드를 지우고 새롭게 텍스트 필드를 만들어서 테스트 해보길 바란다.
글
[AS3] 다이나믹 넘버링...
글
[AS3] CenterPoint 클래스 예제
아래 예제에서는 rotation을 하고 있는 rectangle의 특정 좌표 점을 클릭하게 되면 DisplayObject의 중심점을 이동하며 한번의 클릭당 해당 오브젝트의 scaleX, scaleY를 각각 0.05 값만큼 증가시키도록 해 놓았다.
이는 실질적으로 표시 오브젝트의 중심점이 이동하는 것이 아니라 local 좌표와 global 좌표간의 gap에 따라서 위치 이동하는 것으로, 생성한 CenterPoint에 있는 get, set 메소드인 rotation 메소드를 통해서 로테이션이 컨트롤 되며, scaleX, scaleY의 값 또한 CenterPoint 클래스에 작성한 메소드를 통해서 컨트롤 되도록 되어 있다.
글
[AS3] 호(arc)를 그리는 클래스
글
[AS3] Pen 클래스 테스트
글
[AS3] UIScrollBar 동적으로 스킨 적용하기
개인적으로 웹상에 올려지는 스크립트들을 이쁘게(?!) 보이도록 만들어 보려고 AScodeViewer를 작업하고 있는데, 외부에 있는 Style xml 데이터를 로드하여 사용자가 작성한 xml에 따라서 UIScrollBar와 기타 화면상의 DisplayObject들의 스타일을 적용하는 과정에서 컴포넌트의 스킨을 동적으로 적용을 해야 했다. 웹상에서 찾아보았지만 그와 관련된 자료를 찾지 못하여 임의로 적용해 보게 되었다.
일단은 컴포넌트의 스킨을 동적으로 적용하기 위해서는 기존의 컴포넌트들이 어떠한 형태로 스킨을 적용하고 있는지, 구조를 파악할 필요가 있다. 컴포넌트를 스테이지에 올려놓고 안으로 들어가보면 해당 컴포넌트에서 사용되는 기능별 무비클립들을 볼 수 있는데 이러한 무비클립들은 2 프레임에 위치하고 있기 때문에 외부에서 직접 해당 무비클립에 접근 할 수는 없다.
라이브러리에 있는 Component Assets -> ScrollBarSkins 폴더에 보면 사용되는 무비클립들을 볼 수 있는데 이들 무비클립들에는 각각 내부 클래스가 지정되어 있다. 이 클래스들이 각각의 무비클립을 대변한다고 볼 수 있다.
그럼 각각의 무비클립의 색을 변경하기 위해서는 어떻게 해야 할까… 여러가지로 실험도 해보고 고민을 해보았는데 일단은 아래 방법은 개인적으로 작업하는 과정에서 만들어 낸 결과이기 때문에 옳은 방법이 아닐 수 있음을 밝혀둔다.
UIScrollBar 컴포넌트의 상속 관계에서 setStyle 메소드를 발견할 수 있는데 이 메소드는 스타일 적용에 필요한 default 클래스를 custom 클래스로 대체할 수 있도록 해준다. 따라서 setStyle 메소드를 통해서 기존에 등록되어 있는 각 무비클립의 클래스를 자신이 원하는 기능을 하는 클래스로 대체할 수 있다는 이야기다. 아래는 디폴트로 지정되어 있는 클래스들이다.
ScrollArrowDown_disabledSkin
ScrollArrowDown_downSkin
ScrollArrowDown_overSkin
ScrollArrowDown_upSkin
ScrollThumb_downSkin
ScrollBar_thumbIcon
ScrollThumb_overSkin
ScrollThumb_upSkin
ScrollTrack_Skin
ScrollArrowUp_disabledSkin
ScrollArrowUp_downSkin
ScrollArrowUp_overSkin
ScrollArrowUp_upSkin
그리고 아래는 디폴트 클래스와 매칭되는 문자열들이다.
downArrowDisabledSkin
downArrowDownSkin
downArrowOverSkin
downArrowUpSkin
thumbDownSkin
thumbIcon
thumbOverSkin
thumbUpSkin
trackSkin
upArrowDisabledSkin
upArrowDownSkin
upArrowOverSkin
upArrowUpSkin
일단 적용한 형태를 보면 아래와 같다.
위 코드에서는 적용할 UIScrollBar를 전달 받아서 setStyle 메소드를 통해서 각 무비클립의 클래스들을 새로운 클래스(D로 시작하는 클래스들)들로 대체했다. 새로 대체한 클래스에서는 각각 디폴트로 지정되어 있는 클래스들을 extends 시켰다. 이렇게 한 이유는 라이브러리에 있는 컴포넌트 무비클립들을 그대로 사용하기 위함이다.
이렇게 작성하게 되면 컴포넌트에서 사용하는 각각의 무비클립에서 원하는 기능을 수행할 수 있는 새로운 클래스들로 대체했기 때문에 새로 등록된 클래스 안에서 무슨 짓을 하더라도 플래시가 용서해 준다…쿠쿠
각 클래스 안에서는 자신의 무비클립의 색을 변경하는 클래스를 통해서 색과 알파값등을 세팅하도록 하였고 셋팅하는 방법으로는 중앙에 Singleton 클래스를 만들어 놓고 xml에서 전달받은 스타일을 각 무비클립에 입히는 방법으로 사용했다. 참고로 색 변경에 사용한 간단한 클래스도 올려 놓는다.
이 과정중에서 버그를 발견하게 되었는데 다른 것들은 위에서 언급한 문자열을 통해서 클래스를 대체할 수 있었으나 유독 trackSkin(스크롤바의 기본 바탕이 되는 배경)의 경우 클래스를 대체하지 못하는 문제가 있다. 이 문제로 검색을 해 보니 adobe에 버그로 등록되어 있는 것 같은데 그 해결책은 찾지 못하였다.. 그렇다고 그냥 지나칠 수 있낭…자존심이 허락하는 범위 안에서 꼼수를 부렸다.
적용한 방법은 쿠쿠 웃기는 이야기이긴 하지만 컴포넌트 스킨에서 스크롤바의 배경이 되는 무비클립을 투명으로 처리하고 스크롤바 아래에 무비클립을 두어 스테이지가 변경될 때 스크롤바의 크기와 위치에 따라 이동하는 배경 무비클립을 따로 만들어 놓고 그 무비클립의 색을 변경하는 방법으로 적용했다…쿠쿠 약간 찜찜하지만 trackSkin 버그 문제가 해결되기 전까지 임시방편으로 적용해 두기로 했다.
스테이지 상에서 무비클립들을 직접 수정하여 사용할 경우 일단 사용된 최초 컴포넌트만을 사용하기 때문에 서로 다른 스킨을 적용하기가 어렵지만 이러한 방법을 사용하면 컴포넌트 각 인스턴스에 개별적인 스킨을 적용할 수 있다.
AScodeViewer는 거의 85% 정도 완성된 것 같다. FlashDevelop의 as 코드 스킨과 스크립트 창의 배경까지 직접 xml을 편집하여 사용할 수 있도록 하였기 때문에 자신의 FlashDevelop 환경과 거의 비슷한 화면을 웹상에 올려놓을 수 있을 듯 싶다. FlashDevelop에서 사용하는 xml데이터를 그대로 사용하다보니 AS 코드 뿐만이 아니라 Java나 기타 언어에서도 사용 할 수 있을 듯 싶다. 중요 포인트는 풀스크린 모드 기능을 지원한다는 것이 아닐까 싶다....
글
[FlashCS3] Auto Format 기능 주의...
아래 코드의 경우 예상되는 결과값은 9가 되어야 하지만 스크립트 창에 있는 Auto Format 기능을 실행해서 코드를 정렬하고 퍼블리시를 해보면 결과는 엉뚱하게 7이 나온다.
Auto Format 기능을 실행하게 되면 return 이후에 나타나는 ()는 리턴값으로 간주하여 ()를 제거해 버린다. 이 때문에 결과로 내보낼 사칙연산 순서가 b*c + a로 되어버린다. 실제로 Auto Format 기능을 실행하면 아래처럼 코드상에서 ()가 제거된 것을 확인 할 수 있다.
간단한 코드의 경우에는 문제가 되는 부분을 찾을 수 있겠지만 덩치가 큰 코드의 경우에는 Auto Format 기능 한방으로 예상치 못한 에러 아닌 에러를 내는 곳을 찾기란 쉽지 않다. 그나저나 FlashDevelop은 왜 Auto Format 기능 안 넣는겨….
글
[AS3] BitmapData.lock and unlock 기능
public function lock():void
언어 버전 : ActionScript 3.0
Player 버전 : Flash Player 9
이 BitmapData 객체를 변경할 때 BitmapData 객체를 참조하는 어떤 객체(예: Bitmap 객체)도 업데이트되지 않도록 이미지를 잠급니다. 성능을 높이려면 setPixel() 또는 setPixel32() 메서드를 여러 차례 호출하기 전후에 이 메서드를 unlock() 메서드와 함께 사용합니다.
레퍼런스의 내용만으로는 정확히 어떠한 역할을 하는지 알기 쉽지 않다. lock 메소드는 BitmapData의 정보를 화면에 draw하는 처리과정을 일시적으로 사용하지 않도록 하여 불필요한 처리과정을 제거함으로써 퍼포먼스를 향상시킬 수 있다. 예를 들면
보통 BitmapData를 처리하기 위해 addChild(new Bitmap(bitmap))와 같이 addChild한 이후에 setPixel() 또는 setPixel32() 메소드를 사용하는 경우가 많은데, 이때 setPixel() 또는 setPixel32()와 같은 메소드는 그 메소드 자체 처리만으로도 addChild 되어 있는 경우 화면에 draw하는 기능을 함께 처리해 버린다. 따라서 addChild되어 있는 BitmapData에 setPixel() 또는 setPixel32() 메소드를 여러 번 사용하여 복잡한 처리를 할 경우에 setPixel() 또는 setPixel32() 메소드를 호출될 때마다 화면에 draw 하기 때문에 불필요한 CPU 처리를 하게 되는 것이다.
물론 setPixel() 또는 setPixel32()메소드의 처리 과정을 화면에 표시해야 하는 경우라면 별로 효력이 없겠으나 setPixel() 또는 setPixel32() 메소드를 여러 번 처리한 이후 결과만을 화면에 표시할 경우는 lock 메소드를 통해서 화면에 표시하는 기능을 잠그고 일련의 처리를 완료한 이후에 unlock 메소드를 통해서 잠근 기능을 풀어주면 불필요한 처리를 하지 않으면서 화면에 처리한 결과를 표시할 수 있다.
아래 예제를 돌려보면 lock/unlock를 사용하지 않았을 때와 사용했을 때의 차이를 확인 할 수 있다.
output 결과는 시스템에 따라 다소 차이가 있을 수 있는데 테스트한 컴퓨터 스펙은 아래와 같다.
소니 바이오 노트북 VGN-SZ18LP
Genuine Intel® CPU T2400 @ 1.83GHz
메모리 1.50GB RAM
글
[AS3] SelectArea, DrawShape and Sewing
일단은 클래스의 구조는 아래와 같이 작성했다.
DrawShape.as
이 클래스는 Point 요소를 가지고 있는 Array를 전달하고 그것을 통해 그려진 Shape를 돌려주는 클래스
Sewing.as
이 클래스는 Point 요소를 가지고 있는 Array를 전달하고 그것을 통해 외각선을 그려주는 클래스
SelectArea.as
이 클래스는 DrawShape와 Sewing클래스를 통해 그려진 Shape에 걸쳐진 오브젝트들을 Array로 반환하는 메소드를 가지고 있다. 여기에는 마우스를 UP을 했을 때 Event를 dispatch하게 되는데 이벤트를 받는 메소드에서 기존의 array 요소 중에서 선택된 오브젝트 요소를 가지고 있는 새로운 배열을 참조할 수 있게 하였다.
아래 예제에서는 랜덤한 위치에 생성한 오브젝트들을 마우스 down and drag, up을 통해서 선택을 하면 대각선 방향으로 정렬하게 해놨는데 대각선으로 정렬되는 것은 일정한 규칙이 있는 것은 아니고 디테일하게 하기 귀찮아서 그냥 되는대로 정렬해놨다…쿠쿠 목적이 없는 예제는 슬슬 힘이 빠진다는..;;
글
[AS3] Head First - OOAD AS3로 변환
이 구조는 책의 2장까지 나와 있는 내용 중에서 final 버전이다. 책에서는 이 프로그램을 객체지향의 원리
(변하는 것을 캡슐화하라,
구현에 의존하기 보다는 인터페이스에 의존하도록 코딩하라,
각 클래스는 변경 요인이 오직 하나이어야 한다.)
에 입각해서 다시 5장에서 리펙토링하게 되는데 그 버전은 다음에 바꿔볼 생각이다. 어떤 문제를 풀 때 역행으로 분석해 보는 것도 상당히 도움이 된다.

// FindGuitarTester .as
// Inventory.as
// GuitarSpec.as
// Guitar.as
// Builder.as
// Wood.as
// Type.as
글
APE : SpringConstraint의 이벤트는 왜...
Collide 이벤트를 가지고 형광등을 표현해 봤다. 형광등의 진공 유리관에도 collide 이벤트를 적용하려고 했었는데 SpringConstraint에서 이벤트 반응을 하지 않는다. 구조상으로는 SpringConstraint -> AbstractConstraint -> AbstractItem -> EventDispatcher 와 같은 상속관계를 갖고 있음에도 이벤트에 반응하지 않는 것이 좀 이상하다.
일단은 진공관에 대한 이벤트 반응과 collidable을 false로 해 놓았다.
글
[AS3] APE : CollisionCircleParticle
화면에서 마우스를 down한 상태에서 시간의 흐름에 따라 원형의 크기가 커지는데 Max 값은 반지름 80으로 한정하였다. 생성한 오브젝트를 MouseDown and Drag하면 힘의 방향을 바꿀 수 있으며 MouseUp을 하게 되면 마우스 포인트와의 SpringConstraint를 removeConstraint를 실행하여 연결을 끊어 주었다. 이러한 형태는 앙드레 미쉘이 만들고 있는 Revive의 엔진 자체에 있는 마우스 이벤트와 비슷하지만 구현 방법은 아마 다를 듯싶다.
오브젝트가 없는 화면에서 위에서 생성한 방법으로 생성할 수 있는 오브젝트의 개수는 10개로 한정하였다. 생성한 모든 오브젝트들은 서로 collision이 가능하다.(외벽 또한 그러함) 8개로 오브젝트를 한정한 이유는 오브젝트가 많으면 지누 컴이 뻑난다.(쿠쿠)
이러한 형태를 어디에 쓸 수 있을 지는 생각해 봐야겠다. 원래 이런 형태로 테스트 하려고 했던 것은 아니었는데 하다 보니…
원래 하려고 했던 것은 위에서 언급했던 것과 같이 RectangleParticle의 경우 자체 angle이 지원되지 않아서 중력에 의해서 외부의 충격을 받았을 때 WheelParticle처럼 회전을 하지 못한다는 것을 고민하다가 APE 제작자 alec cove와 APE를 사용하는 kiosk(키오스크 작업을 하는지 이름이 그러한지 모르겠다.) 와의 대화를 보고 알게 되었다. 방법은 아래와 같다.
4면에 대한 충돌과 각도에 따라 회전이 가능한 사각형의 오브젝트를 만들 때는 4점이 되는 모서리 부분에 CircleParticle을 생성하고 그 모서리의 외각선을 따라 각각 4개의 SpringConstraint로 연결해 준다. 이렇게만 하면 4점이 모두 연결 되었으나 외각선에 따라 연결되었기 때문에 충격을 받으면 쓰러지듯이 퍼져버린다. 이를 방지하기 위해서 모서리 4개 중에서 대각선으로 마주보는 CircleParticle들을 연결하는 2개의 SpringConstraint로 연결하되, 그 연결은 non-collidable springs 이어야 한다는 점이다.
위와 같은 방법으로 Group에 추가하면 사각형이 생기고 그 사각형 안에 X자 모양의 두 개의 선이 대각선으로 연결된 모양이 된다. 이렇게 만들어지면 외부의 충격이나 중력에 의해서 다른 그룹에 있는 particle들과의 충돌에 의해서 각도와 좌표가 바뀌는 CustomRectangleParticle을 생성할 수 있다. 이런 방법으로 사각형뿐만 아니라 다각형들도 연결을 통해서 생성할 수가 있다.
그러데 하다 보니 문제가 좀 있다. 4개의 모서리에 있는 CircleParticle의 크기를 작게 할 경우 SpringConstraint도 함께 무게가 실리지 않아서 다른 오브젝트와 충돌했을 때 그 안쪽으로 collision된 오브젝트들이 뚫고 들어온다는 점이다. 엔진의 계산 값이 벗어 났을 때는 오류가 발생한다. 이는 좀더 고민해 봐야겠다.
